How do I know when it’s time to repot a plant?
While it doesn’t need to be done very often, knowing how to repot a plant is an important part of making sure your plant is kept happy and healthy.
If you’ve been paying close attention to your plant, it will tell you when it’s time!
If there are roots coming through the drainage holes of the pot, it’s time to start thinking about repotting your plant.
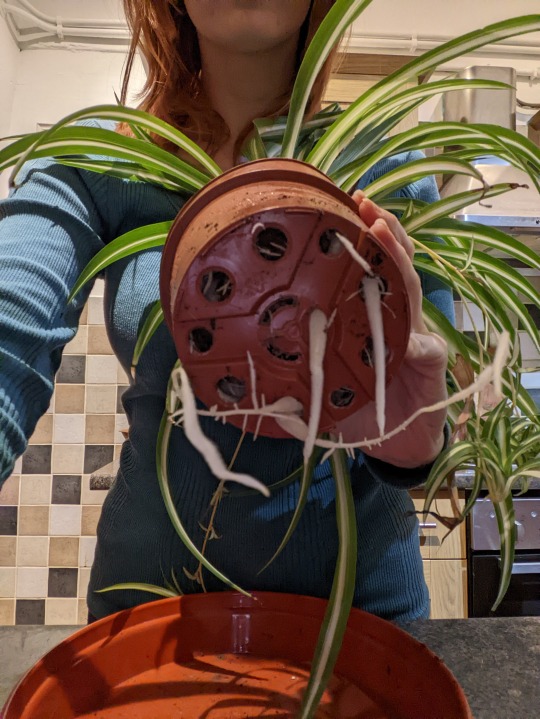
Eventually, there’s nowhere else for the roots to expand. When roots can’t grow down, they’ll grow around, and even up! If left for too long, your plant will start to show signs of nutrient deficiencies or start dropping leaves.
However, it’s not often we lift up our pots to check under them, and rootbound plants often go unnoticed.
If you notice that you’re watering your plant more often than usual, it’s likely that your pot has more roots than soil! Without soil, there won’t be anything to retain moisture in your pot and your plant will soon dry out.
While this isn’t an exhaustive list of all the reasons it’s time to repot your plant – they’re the most common!
Other reasons may include:
- Your plant looks overly large compared to its pot.
- Your plant may fall over easily without the weight of the soil to keep the pot grounded.
- You’ve found a pretty new pot that you prefer to the one you’re already using – this is a perfectly valid reason, too! If this is the case, it may not be necessary to complete all the steps in this guide.
If the pot is the same size, simply lift out the plant with the soil and place it in the new container.
Why is it important to repot a plant?
Many plant owners know that plants need more than water to thrive. They also need nutrients, such as nitrogen, potassium, and magnesium. Fertilising your plant with plant food is the best way to make sure your plant is getting these nutrients.
BUT!
Soil is mainly made up of organic compounds, which over time will break down and be absorbed through the roots. Eventually, you may notice a gap from the soil level to the top of the pot. When soil is spent, it may also look old and crumbling.
When your soil looks like this, chances are it has lost its integrity. It will be difficult for your soil to maintain nutrients – time to repot!

Step by step guide to repot a plant:
You and your plant have spent a while getting to know each other now, and after reading the steps above, you’ve decided to take the plunge and give your plant a new home.
Follow the steps below for a hassle free plant repot!
Choose a pot:
Your new pot is going to be your plant’s new home for quite some time, so it’s important to get it right!
- Don’t choose a pot that’s too large for your plant, often termed ‘overpotting’.It’s highly recommended to repot a plant in a new pot that’s roughly no bigger than 1″-2″ larger than the one your plant has outgrown.Too much unused soil in a pot can sit wet for too long; reducing aeration to the roots, and eventually, your roots may develop root rot.
- Always choose a pot with drainage holes! Another sure fire way to induce root rot is not having drainage holes at the bottom or your pot.Plants don’t like ‘wet feet’, and when water has nowhere to go, will sit at the bottom of the pot in much the same way as it would when there’s too much soil. The water will fill any air pockets through the soil, and your plant can be starved of oxygen.

Choose your soil:
Fresh potting soil is key to making sure that your plant gets a boost of nutrients. Many plant parents (including myself!) like to repot their plants with their own mix – often using a concoction of soil, perlite, and vermiculite. But of course, regular potting soil from the store is absolutely fine!
Some do’s and don’ts of choosing a soil:
- Don’t use garden soil, topsoil, or soil mixed up for outdoor plants.These growing mediums are too heavy and often include clay or sand, and often haven’t been treated for seeds, bugs, and unwanted pathogens that could harm your plant.
- Do choose a soil that suits your plant.Store bought indoor potting soil will generally suit most indoor plants, with the exception of orchids, cacti, or succulents. These plants need alternative potting mediums. Orchids’ roots grow differently to other plants, and cacti and succulents need significantly more drainage.
- Avoid peat based compost. Most peat is sourced from lowland raised bogs, which are becoming increasingly rare across England and the UK. When farmed, peat bogs release carbon into the atmosphere and valuable ecosystems for wildlife are diminished. The sale of peat-based growing media to home gardeners is to be banned in the UK by 2024. You can read more about the effects of using peat here.
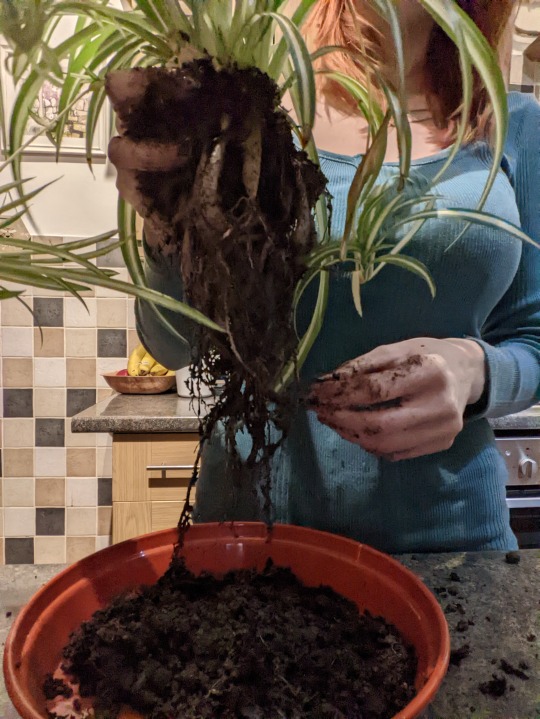
Remove your plant from the old pot:
It’s important to take your time with this step, especially if your plant has an abundance of roots coming through the drainage holes.
Start by squeezing the sides of the nursery pot to loosen the roots and soil from the sides. Support the foliage by weaving your fingers through, close to the base and turning your plant at an angle. You should be able to carefully wiggle the plant out of the pot.
If some of your roots have grown too large to go back through the holes, try giving them a gentle massage to manipulate them through. In a worst case scenario, it may be necessary to cut the plant out of the pot.
You may lose a couple of the roots here and there, but this should be fine.

Loosen the roots!
Chances are if the roots of your plant were poking through the drainage holes, they’re curled tightly around themselves in the pot.
Carefully remove some of the old soil from around the rootball with your fingers and gently loosen them. This will help the roots breathe and reach through the new soil.
Add new soil:
Fill the bottom of your larger pot with fresh soil, about a third of the way up. Your plant should sit comfortably on top of the soil with the base of the plant level with the top of the pot.
When your plant is situated in the middle of the pot, fill in around the sides and the top with your fresh soil. To settle the soil, tap your plant gently on your work surface. If necessary, add a little extra soil on top of the plant to even it out.
Water, thoroughly!
When you repot into a new home, it can be quite stressful for your plant! Make sure it has sufficient water available, and don’t expect to water it as often as you usually do for a few weeks.
Remember your pot has a lot more soil around the roots now and will be able to retain a lot more moisture than before!
And you’re done! Place your plant back in its place and admire all your hard work.
I can’t wait to hear from you next time, and don’t forget to sign up to my newsletter to never miss an update.
Thank you for reading, and happy planting!
Althea